SQL Server Config Manager error ‘Cannot connect to WMI provider’

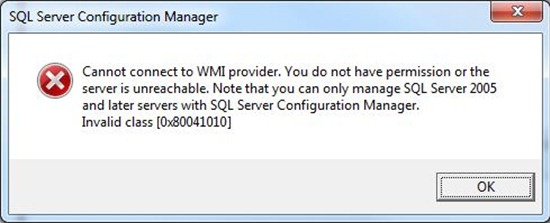
Description: Here I have explained how to resolved SQL Config Manager error ‘Cannot Connect to WMI Provider’

Procedure: 
  • Open command prompt Run As Administrator
  • Go to SQL shared configuration folder as per your SQL version
SQL 2008: C:\Program Files (x86)\Microsoft SQL Server\100\Shared\
SQL 2012: C:\Program Files (x86)\Microsoft SQL Server\110\Shared\
SQL 2014: C:\Program Files (x86)\Microsoft SQL Server\120\Shared\
SQL 2017: C:\Program Files (x86)\Microsoft SQL Server\140\Shared\
You can find more version here
# C:\WINDOWS\system32>cd "C:\Program Files (x86)\Microsoft SQL Server\140\Shared"

# C:\Program Files (x86)\Microsoft SQL Server\140\Shared>mofcomp sqlmgmproviderxpsp2up.mof"
Note: The problem occurs because the Windows Management Instrumentation (WMI) provider configuration file for manage SQL Server services is missing.so,mofcomp command repair or recreate it.

Shrink Database Log File Using Task Scheduler

Description:  Here I have explained how to shrink database log file using batch file in Task Scheduler
Procedure: 

  1. First create TSQL script in sql as follow:

—————————— TestDB ———————————
use TestDB
go
alter database TestDB set recovery Simple
go
dbcc shrinkfile (‘TestDB_log’,1)
go
alter database TestDB set recovery Full
Go
——————————- TestDB_new ————————–
use TestDB_new
go
alter database TestDB_new set recovery Simple
go
dbcc shrinkfile (‘TestDB_new_log’,1)
go
alter database TestDB_new set recovery Full
Go
—————————————————————————-
   2. Save above file as LogCleanup.sql file in C:\Scripts folder
   3. Create batch file to run TSQL script as follow and save it as logclean.bat to  C:\Scripts 
sqlcmd -S SQLSERVER\SQL14 -E  -i “C:\scripts\LogCleanup.sql”

Note: SQLSERVER\SQL14  SQL Instance Name
    4. Add schedule in task scheduler to run above batch file.

Restore Database To Lower Version in MSSQL

Description: Restore database from Higher Version of MSSQL to Lower Version
Procedure:

  • Open SQL server management studio in 2014
  • Right Click on Database > Tasks > Generate Script

  • Click on Advanced
  • Make 2 Changes
  • Script for server Version : SQL Server 2008
  • Types of data to script : Schema and data

  • After completed open query in SQL management studio and change location of datadir and log file according destination database server and save file in .sql
  • Open .sql file in destination server that will create database and migrate all data in new database server.

Move Microsft CRM Databsae to Another Server

Procedure :

  • Open windows registry using Run — regedit
  • Change below registry value
  • HKEY_LOCAL_MACHINE\SOFTWARE\Microsoft\MSCRM\configdb
  • DataSource=SQLServer;InitialCatalog=MSCRM_CONFIG;Integrated Security=SSPI    to
  • DataSource=NewSQLServer;InitialCatalog=MSCRM_CONFIG;Integrated Security=SSP
  • Backup Current Organization Database and Restore it to  New SQL Server
  • After restore database change in deployment manager as follow:
  1. Disable the organization
  2. Edit the organization properties
  3. Change the SQL Server Name and Reporting Server Name to that of the new SQL Server
  4. Enable the organization
  5. Please make sure to install CRM 2015 reporting extension

Shrink WSS_Login_Database in Share Point

  • By defaults WSS_Logging  keeps 14 days information that result in a big database. 3 days information is sufficient for most test.
  • Check below result from Sql Management studio and size of database
  • To change in log configuration you need to open Share point management shell As a Administrator.
  • Below command is use to find the current configuration of log in Share Point

    PS C:\Users\dynamicsax.admin> Get-SPUsageDefinition
  • Run below command to change log days from 14 to 3
    PS C:\Users\dynamicsax.admin> Get-SPUsageDefinition  | ForEach-Object { Set-SPUs
    ageDefinition $_ -DaysRetained 3}
  • Then check again using above given command you will get below output.
  • 

Change SQL Server Analysis Server Mode Multi-Dimensional to Tabular Mode

Description :  Here I have define how to change SSAS [SQL Server Analysis Server] mode from multidimensional to tabular mode.

Procedure:

  1. Backup any multidimensional databases on your server and either detach them or delete them. You will not be able to load them on the tabular instance.
  2. Copy the msmdsrv.ini file to your desktop. For my instance (which I called TABULAR, I installed it like that from setup), I found the config file in C:\Program Files\Microsoft SQL Server\MSAS11.TABULAR\OLAP\Config.
  3. Open the config file in Notepad. Change the DeploymentMode property from 0 (multidimensional) to 2 (tabular), as pictured. Save and close the file. 
  4. Copy the msmdsrv.ini file back to the OLAP\Config directory.
  5. From services.msc, restart the Analysis Services instance.